Pages

Showing posts with label HSM. Show all posts

Tuesday, June 30, 2015

Yo Ho Yo Ho, A Pirate's Vest for Jake (HSM #6)

For the June HSM challenge, I wanted to take the opportunity to really push myself so I decided to sew a waistcoat for my brother. Before starting, I decided that, no matter how long it took me, I would do it all by hand. I've done exactly two, much simpler garments by hand before but I wanted to focus on my technique. I started in the second week of May and finally finished it today - just in time to snap some pictures (albeit in the dark...with flash).

The garment will be worn for Halloween and he'll get an entire outfit to go with it...eventually. The idea behind his character is that he's an early 18th century gentleman-turned-pirate so he wanted his clothes to reflect that. This was my first time doing sewing a man's garment from that era so learning the fashion and sewing techniques of the day was a challenge in and of itself!

I used Simplicity 4923 (View C) for most of it, making little adjustments to the shoulder and back to fit him better. I also completely re-drafted the pocket flaps so that they curved along the top and came to three points instead of being flat across the bottom.


The front is made up of a teal synthetic fabric. It has a wonderfully subtle floral texture that you can see when the light hits it just right. The back and lining is made of brown linen. I know that the backs often had lacing or ties to tighten the garment, but I decided to not add any of it at this point in time. The fit was great just having taken in the side seams a few inches and I can always add it if the need ever arises.


The embroidery is done with material that I had left over from other projects. The gold detail around the edges is left over from my Halloween dress last year and is couched on with yellow floss. The embroidery on the pockets and buttons is done with metallic floss.


Sewing the pocket flaps.

One of the hardest parts of this project was all of the buttons. I'm terrified of buttons and buttonholes. That I'll mess up and won't be able to get them to line up and then I'll have ruined it! I put it off for a long time but eventually there was no way around it so I had to meet it head-on.

I bought three packs of cheap plastic buttons that were on sale for $0.40 and spent last Sunday covering 20 buttons with embroidered pieces of fabric. It took me literally all day. I was very slow at it at first, but I got in a good groove by the end. 


Pictured atop "18th Century Embroidery Techniques" by Gail March -- absolutely wonderful!

I sewed them onto the waistcoat that night but put off the buttonholes as long as I could.


I'd made buttonholes from the same era once before, but I was still very worried. I finally sat down today after work and worked my way through them. I'd done plenty of research beforehand and took my time to try to get it all right and, while they're passable, I know I still have a long way to go.


As a bonus, I spent an afternoon back in May to sew a neck stock out of a few inches of spare cotton I had lying around. It was a very quick project and I'm very happy with it. I feel like it adds so much to the overall look. I want to add a few rows of lace or ruffles to the bottom, though, to cover the small gap between it and the top of the waistcoat where you can see the ties on the shirt (from his Renaissance outfit from last year).


Overall, I'm incredibly happy with the waistcoat it turned out. I'm proud of all the detail I put into it and I would grade myself a solid B on the buttons. At least they all line up and I didn't ruin anything!


Next up pants and some proper photos!
The Challenge: Out of Your Comfort Zone (HSM #6)
Fabric: Teal, synthetic fabric and brown linen
Pattern: Simplicity 4923 
Year: Early/mid 1700s
Notions: Black thread, covered plastic buttons, gold trim. Teal, gold, and yellow embroidery floss.
How historically accurate is it? Pretty up there. Except for the synthetic fiber content. I'd say somewhere around 80%.
Hours to complete: A month and a half, working intermittently
First worn: Tried it on today. It will be worn in October.
Total cost: Pattern and gold trim from stash. One and a half yards of linen for about $6. One yard of teal synthetic fabric for about $4. Floss and buttons together totaled about $2. All together: $12.

Tuesday, March 31, 2015

1920's Day Dress - (HSM #3)

I spent a long time thinking about this month's challenge, stuck for several weeks. While I had plenty in my stash that I could draw from, I had a hard time finding any inspiration. I can't tell you how many times I sorted through my patterns and pinterest boards, looking for something that would spark my interest. 

Then, about two and a half weeks in to March, I happened upon a new show.


There are two seasons on Netflix and I'm already on my second watch-through.

It's about a female detective, Phryne Fisher, who solves crimes in 1920's Australia with the aid of her wonderful friends, the local police, and Detective Inspector Jack Robinson. The show is filled with fun mysteries, lavish sets, and some of the most amazing chemistry between I've ever seen. Not to mention gorgeous costumes.


And so I decided that for the third HSM challenge, I was going to make something from the 1920's. I have a set of instructions for the infamous "One Hour Dress," but I'd made it once before a few years ago and I wasn't happy with how it turned out. So, I turned to the internet to browse for a new method of construction.


I was a big fan of these dresses and I had a pattern in my stash that I could adapt to make a similar skirt.


Simplicity 1802. Last night I spent twenty minutes cutting out the three pattern pieces that I would use and sorting through my stash to pick out the fabric.

In doing so, I discovered that most of my stash is made up of quilting cotton, which was too stiff for this project. I wanted something sheer, but, in the end, went with a length of green fabric that I'd forgotten I had. I have no idea as to where it came from or its content, but it drapes nicely and I had enough of it to get a dress out of.

Fabric up close. It's less olive-y in person.
I used the bottom half of the pattern, dropped it down a few inches so it would start around my hips, and drafted the top part of the dress from a loose-fitting t-shirt that I have.


I cut it out in two pieces, front and back, plus the four u-shaped godets. Then, this morning, I sat down to sew.


It went pretty quick and I had it done early in the evening, though I would have been faster if I hadn't been distracted by TV while I was working. After a while I turned it off and put music on instead and worked much more efficiently.

Trying it on to check the fit of the top.
Trimming the bottom.
By the time I finished it was dark, so there wasn't enough light inside to get good photographs. But phone pictures will do until I'm able to take proper pictures of it with my Nikon.


It's a very simple dress, but I like it. It went much better than the last '20's dress that I made (too tight across the chest) and is very comfortable, especially with summer around the corner. It's nowhere near as fancy as Phryne's outfits from the show, but I could see her companion, Dot, wearing something like it.

The Challenge: Stashbusting (HSM #3)
Fabric: Green knit
Pattern: Skirt from Simplicity 1802
Year: 1920s
Notions: Green thread. No closures or anything; it slips over my head.
How historically accurate is it? Ummmm, 50%? That would be my guess. I went for more overall aesthetic than accuracy on this one as '20's styles aren't the most flattering on me.
Hours to complete: About 7.
First worn: Tried it on to take pictures. I will probably wear it on Thursday.
Total cost: Since everything came from my stash, $0. (I don't remember what I got the fabric for when I bought it but I know that I got the pattern for $1.)

Saturday, February 28, 2015

1930's Skirt - (HSM #2)

The 1930's have never been my forte, fashion-wise. While I've admired that period of history for other reasons, I'd always been under the impression that the long, slim lines would look silly on me.


But when I saw this new pattern on sale at Joann's for $1, I couldn't pass it up. At the very least, I could give the fashions a real chance before making up my mind.


Since the prompt for this month was 'blue,' I pulled out a length of plaid fabric from my stash and started sewing up option B, without the belt. The pattern itself was really straightforward and easy to put together. There are seven gores; one of which I cut on the bias.

I ran in to two problems during the construction:

1. The fabric was too stretchy. It's not really a stretchy fabric in and of itself, but when the pieces were put together, it was too big and just slipped right off my waist. I'd cut my regular size but had to take 8 inches out of the waist.


2. Pockets. Enough said.

I don't know why I thought pockets would be a good thing to add to the skirt, but I did. And, boy, was it ever a bad idea.


As flat as I could get the pockets to lay.
In the picture above, the skirt is finished except for hemming. I tried it on only to find that the pockets gaped, pulled, wrinkled, and looked just plain awful. So I quickly cut them out and sewed the slits closed.


Today was tank-top weather!
 The skirt lays infinitely better with the pockets taken out. I slipped my Oxford heels on this morning to take a few pictures of the finished product and was entirely pleased with how it turned out. I hadn't expected the skirt to flatter me, but I find that my opinion of 30's fashions has changed dramatically!


I like how the front gore looks cut on the bias, but I could have done a better job matching the stripes through the rest of the skirt. The seams around the back don't look too bad, but, looking at it again, I think I should have matched the patterns.

Well, there's always next time.


The Challenge: Blue (HSM #2)
Fabric: Blue/black plaid (with a very subtle pink stripe running through)
Pattern: McCall's M6993
Year: c. 1933, as it says on the pattern.
Notions: Navy thread and zipper. Black hook-and-bar. 
How historically accurate is it? I can't really say. I know that plaid was popular during the 30's, as was cutting on the bias. But, I know the fabric content isn't accurate and I don't know about how I sewed. I would guess somewhere around 60-70%?
Hours to complete: Probably about 5-6. I would have saved myself a lot of extra time if I hadn't wasted time with those stupid pockets.
First worn: Today to take some pictures. I'm planning on actually wearing it on Monday, though.
Total cost: I bought the fabric so long ago, I don't remember its cost. I tend to buy fabric that is around $3/yard and I used about 2 yards. So my guess would be about $6. I had the notions already and I'd bought them at such a low price that they wouldn't even add another dollar onto the total.

Friday, February 6, 2015

1730's Chemise - (HSM #1)

When I saw that the first HSM challenge was 'foundations', I decided that I wanted to use it to make my first foray into the 18th century sewing. Since I started, I've done projects that spanned from medieval to renaissance and then Victorian to modern-day, but nothing in between.


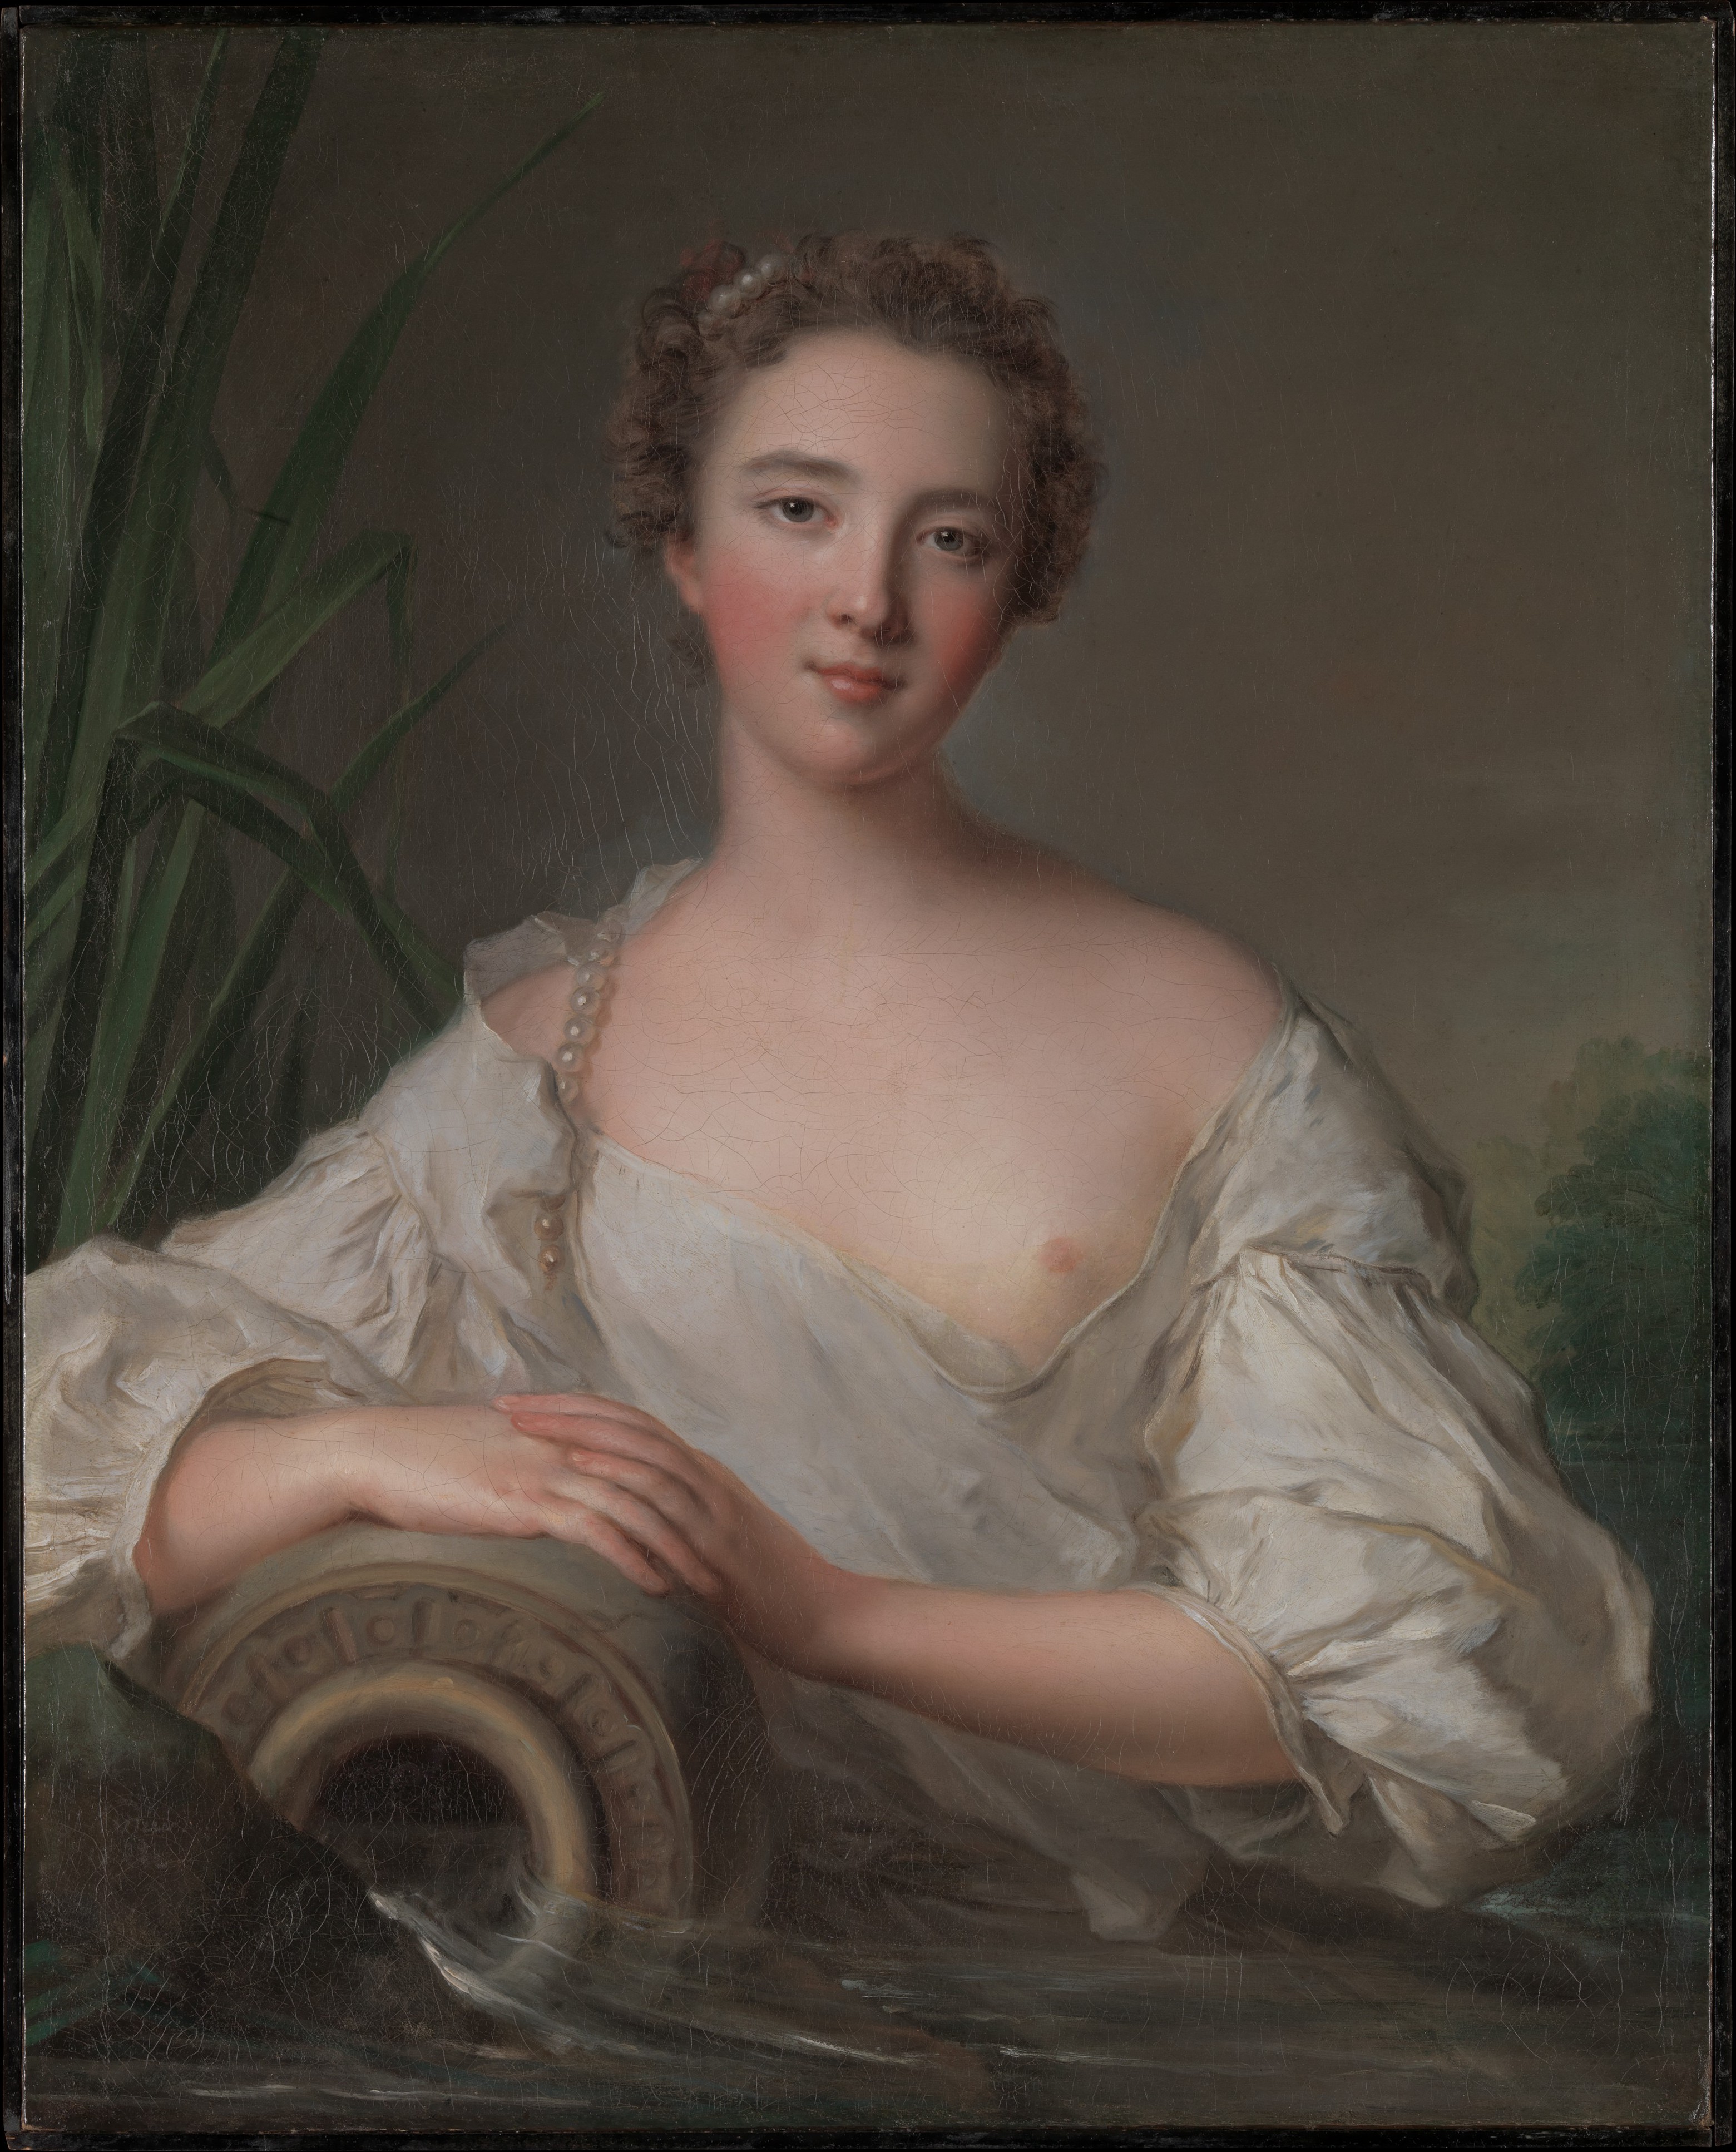
The Spring, by Jean Marc Nattier, 1738 © The Metropolitan Museum of Art
I spent a lot of time doing research because I started with zero knowledge about this era; just a few general ideas about shape and necessary pieces. It took a while, but I decided on the 1730's and based my shift's construction off of the research done by Sharon Ann Burnston and used the painting The Spring (above) as a visual guide.


With all the time I spent doing research, I started really late in the month and had only a couple days to sew it. I swung by Joann's one afternoon before I had to go to work and bought two yards of 90 inch muslin with a 50% off coupon.


The next night I took all my measurements (on the piece of paper at the top of the photo) and laid out the muslin to cut it up. The fabric was folded four layers thick so the front piece wouldn't have to be sewn to the back piece at the shoulders and, as it so happened, 45" was right where I wanted the bottom of my chemise to be so it fit quite perfectly onto the muslin.


I spent the night watching the stage production of Oklahoma! and sewing it all together by hand with cotton thread. I tried to get it all done that night, but, by 4:30 am, I just couldn't do it any more.


It was going well until I got to the sleeves. I had originally planned to just gather them into cuffs that were loose enough so they didn't need an opening, but, looking back at my guide picture and re-reading the instructions, I realized that they actually had a small slit up towards the elbow and closed with a ribbon (or cuff-links) through buttonholes. At first I was going to just move past it, but I couldn't bring myself to and had to go back and re-open part of the sleeves that I'd previously sewn shut.

So it followed me around in a basket for the next couple days as I hemmed the new openings and gathered them in to cuffs. I was a little nervous to do buttonholes for the second time ever, but it turned out alright. At this point I had to face it that I would finish a couple days late but I didn't want to over-do it on the first entry of the year.

So, in the end I finished two days late but I'm glad that I finished it at all. I had a love-hate relationship with all of the hand-sewing along the way but I'm pretty happy with the final product. If I could do it over, I would have made the sleeves a little fuller, but I think it's pretty good.


Final Product:


Front.

Sleeve detail.

Side detail.

Side.


The Challenge: Foundations (HSM #1)
Fabric: White Muslin
Pattern: Made from my measurements using the instructions here.
Year: 1730's
Notions: White cotton thread, pink ribbon
How historically accurate is it? Pretty accurate, I would say. I stuck to historically-accurate methods of sewing and the shape, cut, etc. are right. It's made of cotton, not linen, but there is evidence of cotton chemises from that time.
Hours to complete: I would estimate 10-15. I need to get faster at sewing by hand...or quit getting distracted by mid-century musicals.
First worn: I haven't worn it yet. I did try it on once before I added the sleeves to check the neckline, but that was it.
Total cost: Somewhere around $5 because I ended up having a little less than half of the fabric left over. Everything else was taken from my stash.

Bonjour & Welcome