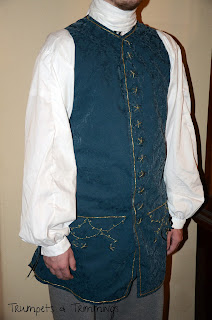
The garment will be worn for Halloween and he'll get an entire outfit to go with it...eventually. The idea behind his character is that he's an early 18th century gentleman-turned-pirate so he wanted his clothes to reflect that. This was my first time doing sewing a man's garment from that era so learning the fashion and sewing techniques of the day was a challenge in and of itself!
I used Simplicity 4923 (View C) for most of it, making little adjustments to the shoulder and back to fit him better. I also completely re-drafted the pocket flaps so that they curved along the top and came to three points instead of being flat across the bottom.
The front is made up of a teal synthetic fabric. It has a wonderfully subtle floral texture that you can see when the light hits it just right. The back and lining is made of brown linen. I know that the backs often had lacing or ties to tighten the garment, but I decided to not add any of it at this point in time. The fit was great just having taken in the side seams a few inches and I can always add it if the need ever arises.
The embroidery is done with material that I had left over from other projects. The gold detail around the edges is left over from my Halloween dress last year and is couched on with yellow floss. The embroidery on the pockets and buttons is done with metallic floss.
 |
| Sewing the pocket flaps. |
One of the hardest parts of this project was all of the buttons. I'm terrified of buttons and buttonholes. That I'll mess up and won't be able to get them to line up and then I'll have ruined it! I put it off for a long time but eventually there was no way around it so I had to meet it head-on.
I bought three packs of cheap plastic buttons that were on sale for $0.40 and spent last Sunday covering 20 buttons with embroidered pieces of fabric. It took me literally all day. I was very slow at it at first, but I got in a good groove by the end.
 |
| Pictured atop "18th Century Embroidery Techniques" by Gail March -- absolutely wonderful! |
I sewed them onto the waistcoat that night but put off the buttonholes as long as I could.
I'd made buttonholes from the same era once before, but I was still very worried. I finally sat down today after work and worked my way through them. I'd done plenty of research beforehand and took my time to try to get it all right and, while they're passable, I know I still have a long way to go.
As a bonus, I spent an afternoon back in May to sew a neck stock out of a few inches of spare cotton I had lying around. It was a very quick project and I'm very happy with it. I feel like it adds so much to the overall look. I want to add a few rows of lace or ruffles to the bottom, though, to cover the small gap between it and the top of the waistcoat where you can see the ties on the shirt (from his Renaissance outfit from last year).
Overall, I'm incredibly happy with the waistcoat it turned out. I'm proud of all the detail I put into it and I would grade myself a solid B on the buttons. At least they all line up and I didn't ruin anything!
Next up pants and some proper photos!
The Challenge: Out of Your Comfort Zone (HSM #6)
Fabric: Teal, synthetic fabric and brown linen
Pattern: Simplicity 4923
Year: Early/mid 1700s
Notions: Black thread, covered plastic buttons, gold trim. Teal, gold, and yellow embroidery floss.
How historically accurate is it? Pretty up there. Except for the synthetic fiber content. I'd say somewhere around 80%.
Hours to complete: A month and a half, working intermittently.
First worn: Tried it on today. It will be worn in October.
Total cost: Pattern and gold trim from stash. One and a half yards of linen for about $6. One yard of teal synthetic fabric for about $4. Floss and buttons together totaled about $2. All together: $12.


